
Notice
Recent Posts
Recent Comments
Link
| 일 | 월 | 화 | 수 | 목 | 금 | 토 |
|---|---|---|---|---|---|---|
| 1 | ||||||
| 2 | 3 | 4 | 5 | 6 | 7 | 8 |
| 9 | 10 | 11 | 12 | 13 | 14 | 15 |
| 16 | 17 | 18 | 19 | 20 | 21 | 22 |
| 23 | 24 | 25 | 26 | 27 | 28 | 29 |
| 30 |
Tags
- Firebase
- swift 6
- Swift Tuist
- swift 5.9
- 카카오뱅크 ios
- Firebase Analytics
- SeSAC
- JSON
- Combine
- swift db
- 네트워크 통신
- observable
- KeyPath
- SwiftUI
- ios database
- ios
- Tuist Swift
- GCD
- xcode
- ribs
- Tuist
- realm
- Subject
- Subscribe
- combinecocoa
- swift
- swift database
- uitableviewdiffabledatasource
- arc
- RxSwift
Archives
- Today
- Total
천원의 개발
iOS Alert 사용법 본문
https://developer.apple.com/documentation/uikit/uialertcontroller
Apple Developer Documentation
developer.apple.com
Alert 구현 단계
1. UIAlertController를 이용하여 Alert 생성
2. addAction를 이용해 생성한 Alert에 버튼 액션 추가
3. present를 이용해 Alert 표현
1. 단계
let alert = UIAlertController(title: "삭제", message: "정말 삭제 하겠습니까?", preferredStyle: .alert)UIAlertController를 이용하여 Alert을 생성 해줍니다.
이때 preferredStyle이 .alert와 .actionSheet로 나뉘는데
Alert preferredStyle
• .alert : 팝업 창이 뜨는 느낌.
• .actionSheet : 아래에서 선택창이 올라오는 느낌.
2.단계
let ok = UIAlertAction(title: "확인", style: .destructive, handler: nil)
let cancel = UIAlertAction(title: "취소버튼입니다.", style: .cancel, handler: nil)
handler안에는 각 버튼이 눌렸을 때의 이벤트를 설정 해줄 수 있습니다.
여기서도 style이 .default, .destructive, .cancel 형태로 나뉘는데
Alert addAction style
.default : 기본 형태
.destructive : 빨간 색으로 강조
.cancel : 취소 액션 (cancel타입을 두 개 이상 넣을시 런타임 에러가 발생하니 주의하자)
이제 생성한 action들을 Alert에 추가해주고
alert.addAction(ok)
alert.addAction(cancel)
3. 단계
present(alert, animated: true, completion: nil)present를 통하여 화면에 보여주면
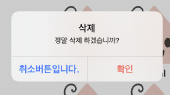
따란🎉
'iOS&Swift🍎 > iOS' 카테고리의 다른 글
| iOS HTTP 통신 허용 (0) | 2022.08.13 |
|---|---|
| iOS 커스텀 폰트 사용법 (0) | 2022.08.11 |
| iOS Local Notification 사용법 (0) | 2022.07.29 |
| iOS UserDefaults 사용법 (0) | 2022.07.17 |
| iOS DateFormatter 사용법 (0) | 2022.07.14 |
'iOS&Swift🍎/iOS' Related Articles
more

