| 일 | 월 | 화 | 수 | 목 | 금 | 토 |
|---|---|---|---|---|---|---|
| 1 | 2 | 3 | 4 | 5 | 6 | 7 |
| 8 | 9 | 10 | 11 | 12 | 13 | 14 |
| 15 | 16 | 17 | 18 | 19 | 20 | 21 |
| 22 | 23 | 24 | 25 | 26 | 27 | 28 |
- combinecocoa
- Swift Tuist
- 네트워크 통신
- Combine
- 카카오뱅크 ios
- Tuist
- KeyPath
- xcode
- ios
- Tuist Swift
- SwiftUI
- Subject
- realm
- SeSAC
- swift 5.9
- swift db
- ribs
- swift database
- swift 6
- RxSwift
- Firebase
- swift
- uitableviewdiffabledatasource
- GCD
- arc
- Subscribe
- JSON
- Firebase Analytics
- observable
- ios database
- Today
- Total
천원의 개발
iOS Firebase Cloud Messaging Service를 이용하여 Remote/Push Notification 사용하기 본문
iOS Firebase Cloud Messaging Service를 이용하여 Remote/Push Notification 사용하기
천 원 2022. 10. 12. 04:10APNs ?
동작 방식을 알아보기 전에 APNs가 무엇인지 살펴봅시다.
APNs - Apple Push Notification service
개발자가 Third Party를 통해 앱에 푸시 알람을 보낼 수 있도록 Apple에서 만든 알림 서비스 플랫폼
여기서 우리는 Third Party로 Firebase를 활용 해보겠습니다.
Push Notification의 동작 방식
우리가 Push를 보내려면 항상 APNs를 통해서 전송 해야 합니다. 그런데 APNs 에서는 어떤 Device에 Push 알림을 보내야 할지 모를 겁니다.

그래서 우리는 Push token을 사용하여 각 Device를 식별 하게 됩니다. 그러기 위해서는 각 Device별로 token을 발급 받아야 합니다.
토큰 발급

Device에서 APNs한테 token을 요청하면 APNs가 응답하여 token을 주게 되고 Device에서 Provider한테 token정보를 알려 주게 됩니다.

Apple 푸시 알림 인증 키 받기
- 먼저 개발자 계정을 보유하셔야 인증 키 발급이 가능합니다.
- 실제 Device에서 테스트해보시길 권장합니다.
Apple Developer 사이트에서 계정 > 인증서(영문)
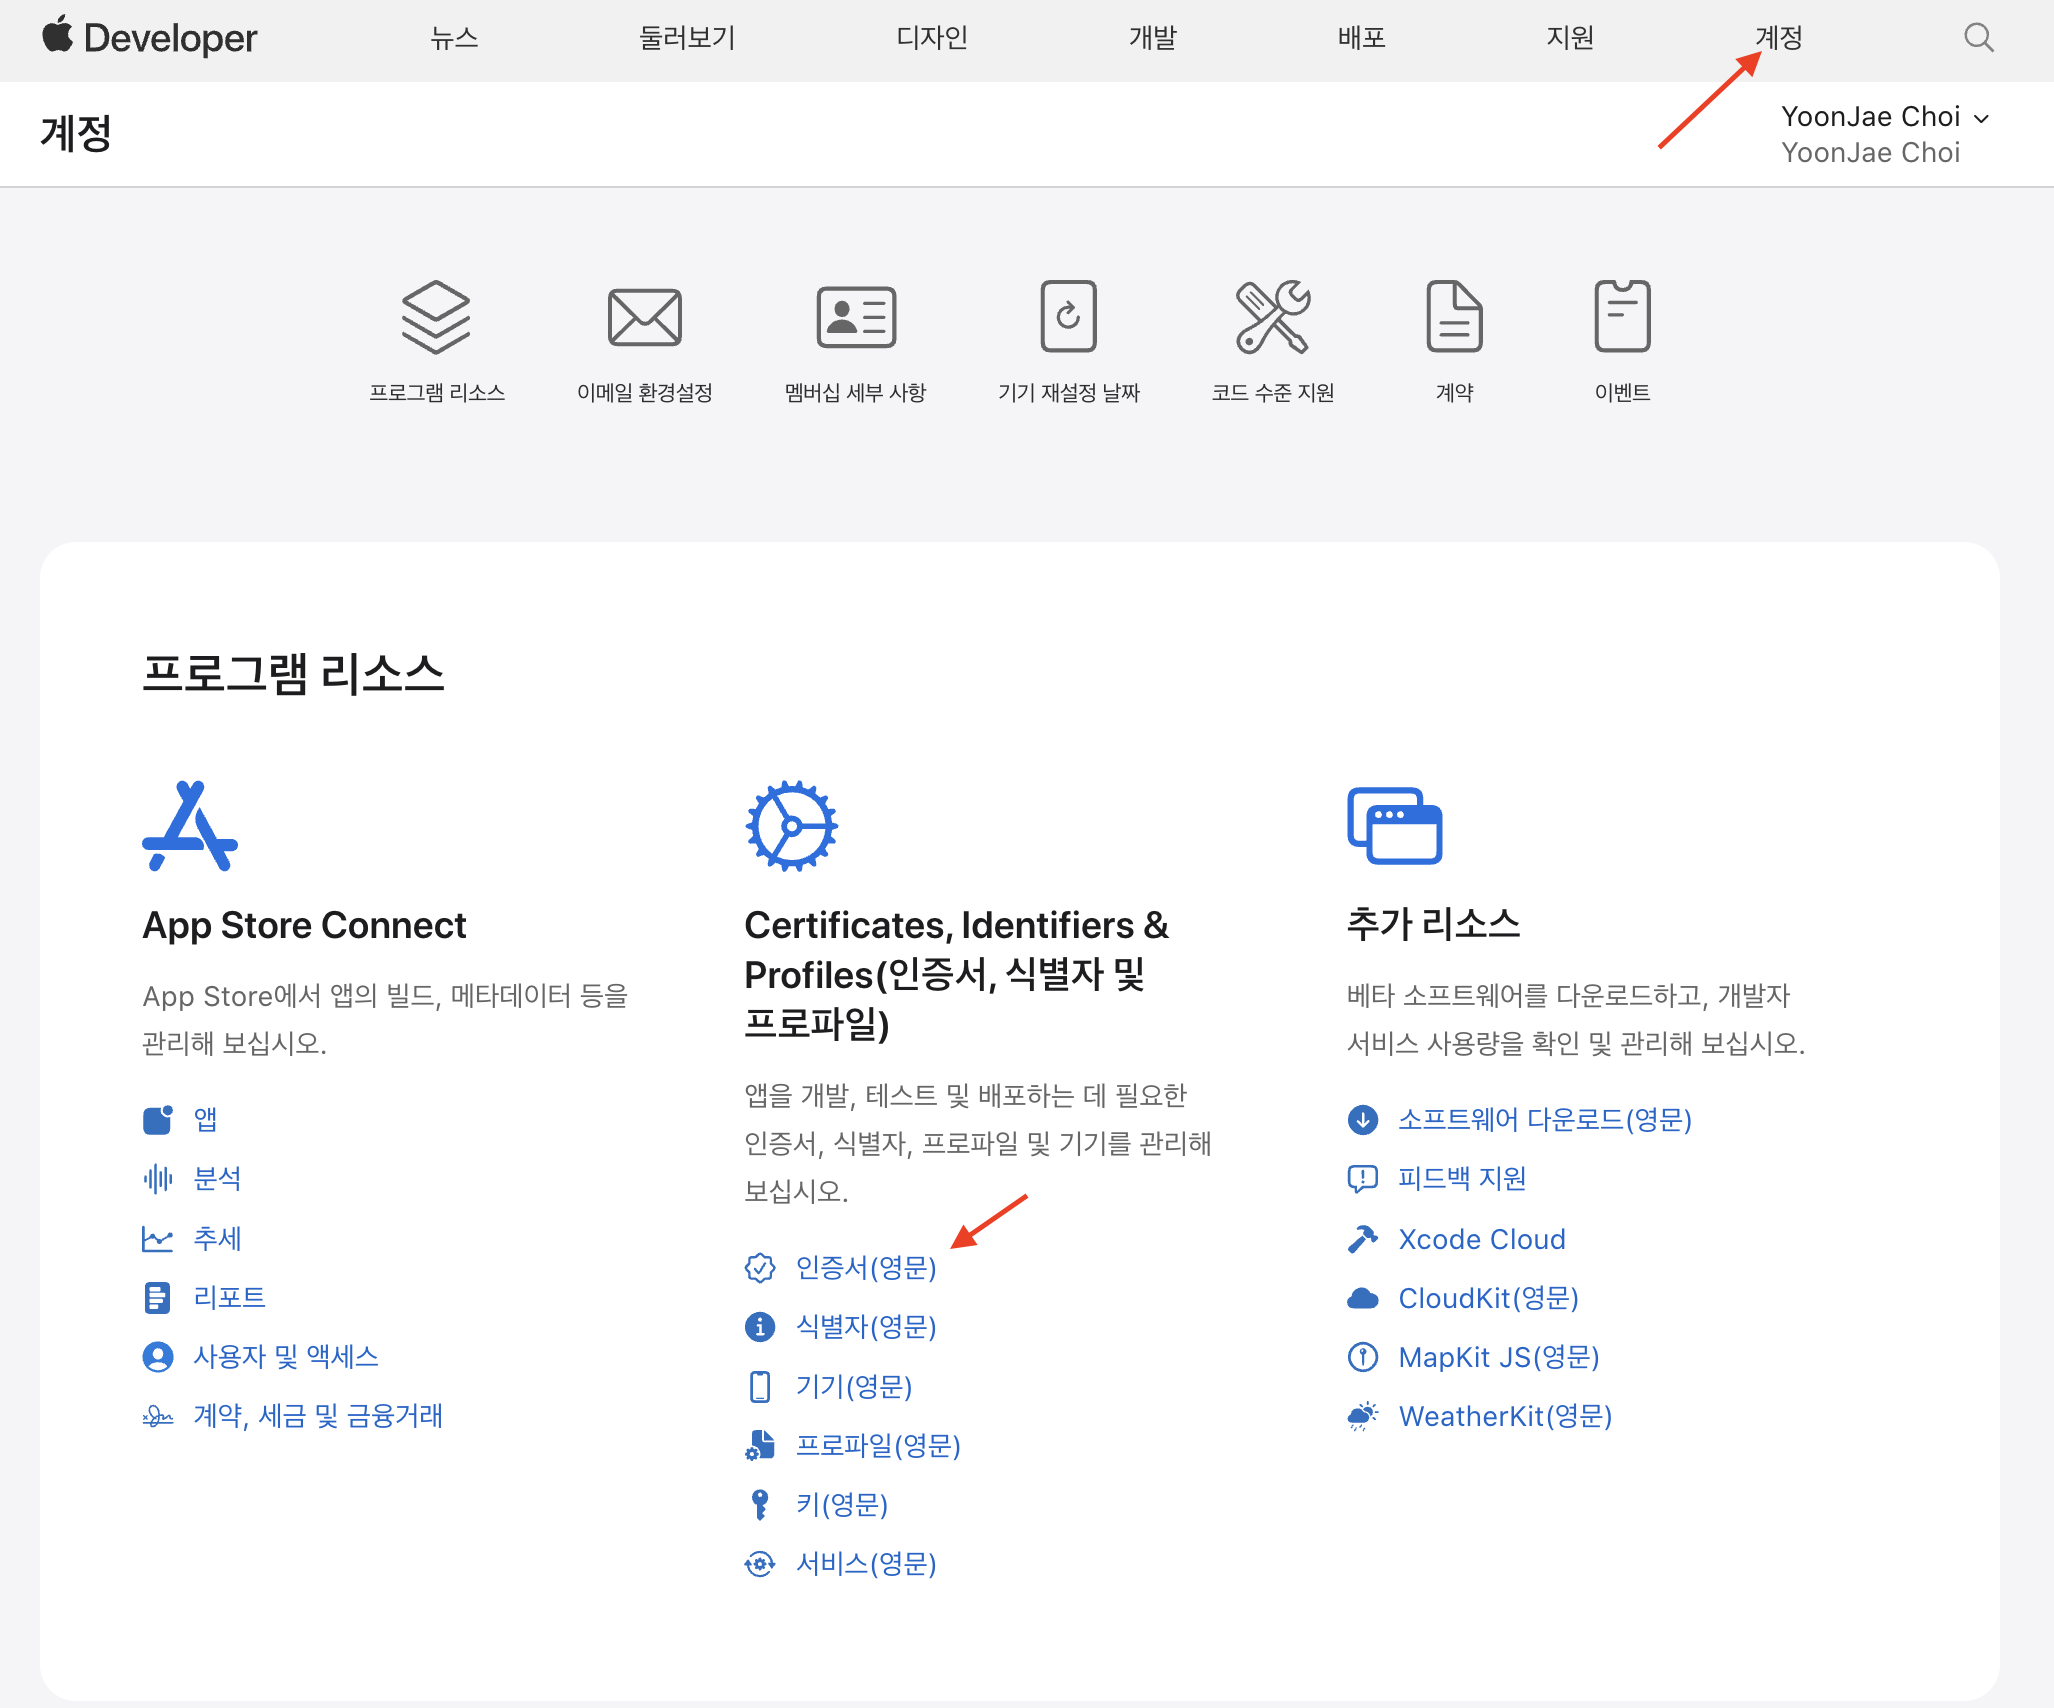
Create a Key를 눌러 Key를 만들어 줍니다.

Key Name과 APNs를 체크 해주시고 Continue 해줍니다.

Register 해주시고

여기서 꼭 Download 버튼을 눌러서 AuthKey_XXXXXXX.p8 파일을 잘 보관해둡시다.
Done과 함께 인증키 발급을 완료합니다.

p8
• Public key로 여러 앱에서 인증키로 사용이 가능하며, 만료 기능이 없습니다.
• 한번 다운로드 후 재다운로드가 불가능합니다.
Firebase 프로젝트 생성 및 SDK 설치
- Firebase Analytics를 참고 하셔서 설치 해주세요. 방법은 동일하고 SPM설치시 FirebaseMessaging 체크 하여 설치 해주시면 됩니다.

Xocde에서 Push Notification 사용 설정
TARGETS -> Signing & Caplabilities > + Capability 를 선택 해줍니다.
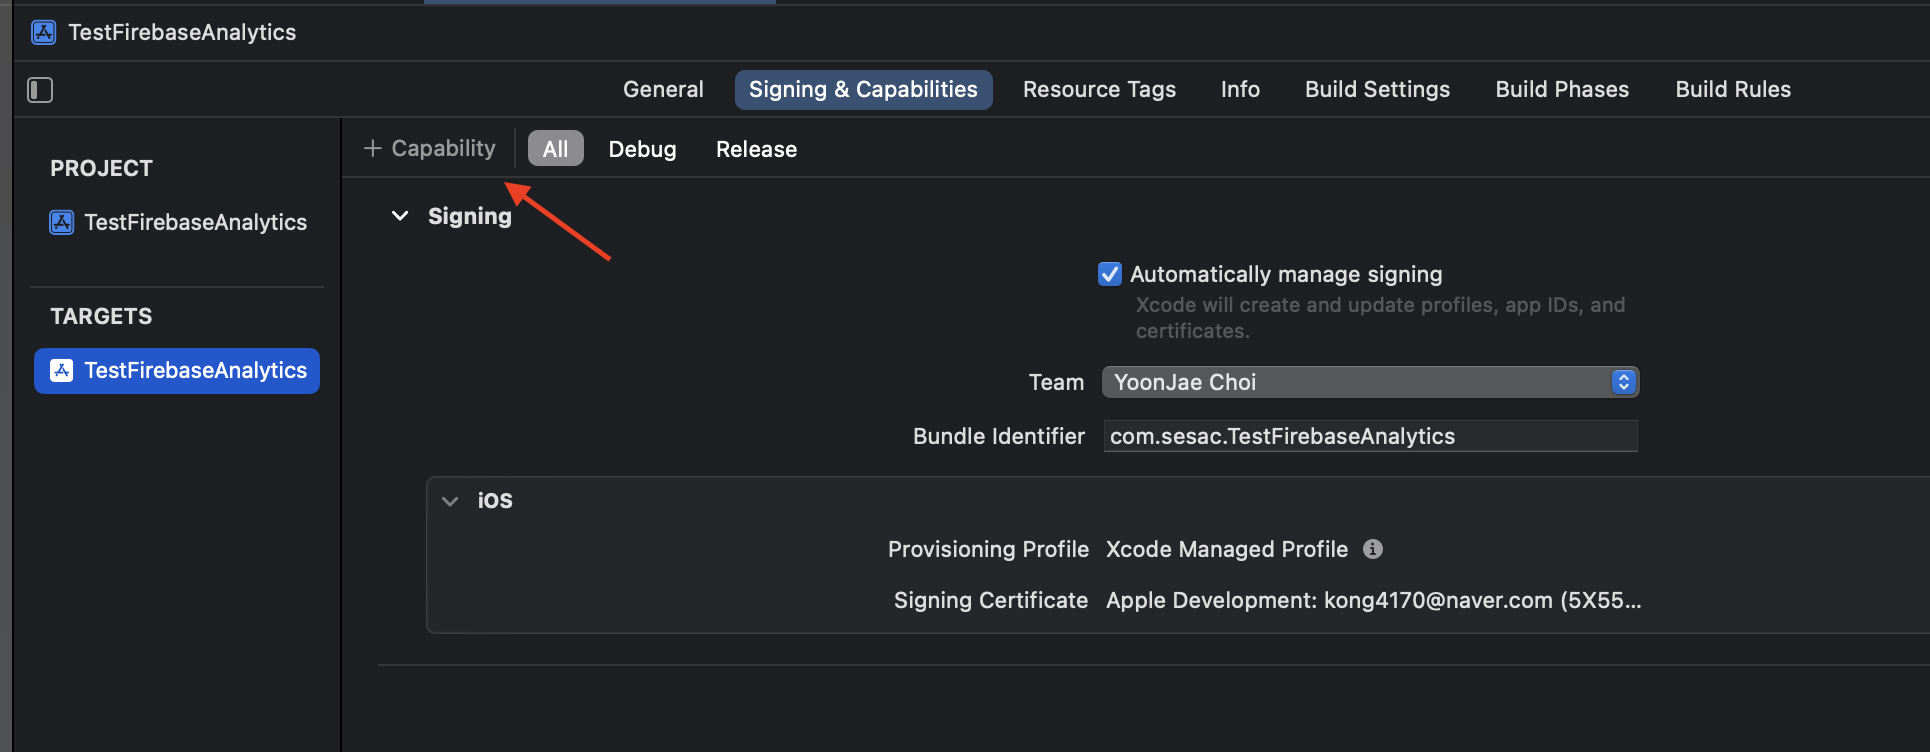
Push Notification, Background Modes를 추가 해줍니다.
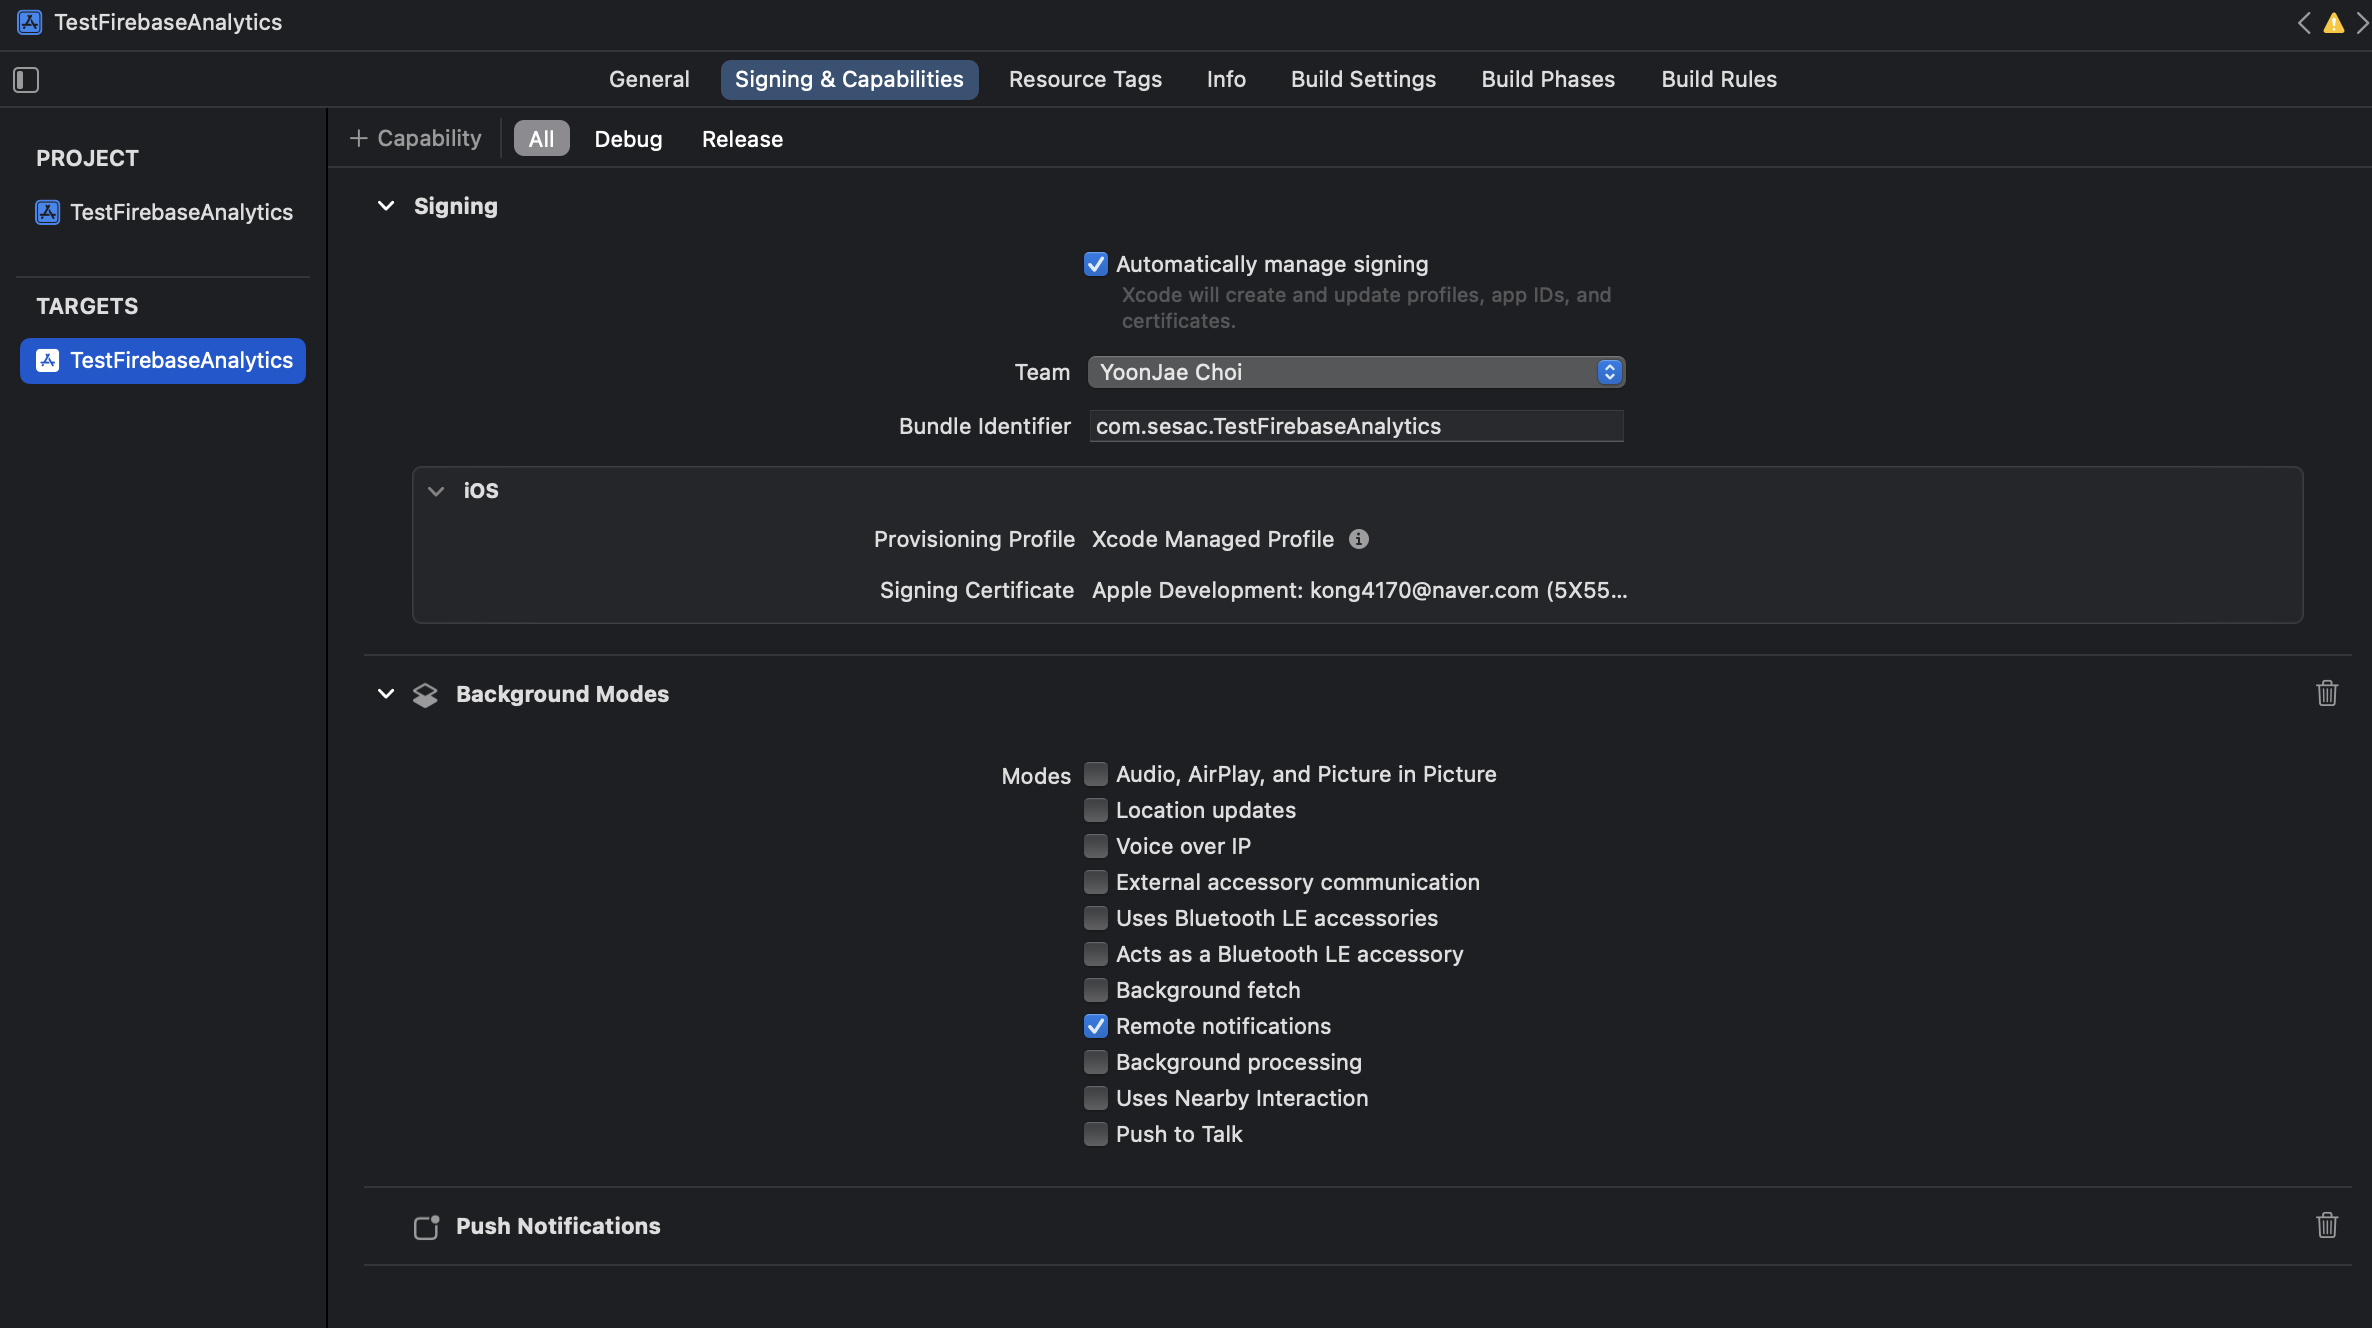
Background Modes에서 Remote notifications을 체크 해줍니다.
인증키 등록 및 개발자 팀 키 등록
인증키는 우리가 위에서 다운로드 한 .p8 파일이고 팀 키는
apple Developer acoount 에서 아래로 내려보면 확인할 수 있습니다.

이제 Firebase에 인증키와 개발자 팀 키를 등록 해봅시다.
프로젝트 설정에 들어가 주세요

APN 인증 키 업로드 버튼을 눌러 줍니다.

키 ID에 .p8 파일의 중간 문자를 넣어 주고 위에서 확인한 팀 ID를 등록 후 업로드 해줍니다.

완료 화면

프로젝트에 알림 등록 코드
- 공식문서를 확인 해보세요.
원격 알림 시스템에 앱을 등록
   func application(_ application: UIApplication, didFinishLaunchingWithOptions launchOptions: [UIApplication.LaunchOptionsKey: Any]?) -> Bool {
        // Override point for customization after application launch.
        FirebaseApp.configure()


        //원격 알림 시스템에 앱을 등록
        if #available(iOS 10.0, *) {
          // For iOS 10 display notification (sent via APNS)
          UNUserNotificationCenter.current().delegate = self

          let authOptions: UNAuthorizationOptions = [.alert, .badge, .sound]
          UNUserNotificationCenter.current().requestAuthorization(
            options: authOptions,
            completionHandler: { _, _ in }
          )
        } else {
          let settings: UIUserNotificationSettings =
            UIUserNotificationSettings(types: [.alert, .badge, .sound], categories: nil)
          application.registerUserNotificationSettings(settings)
        }

        application.registerForRemoteNotifications()

        return true
    }
등록 토큰 액세스
- 기본적으로 FCM SDK는 앱을 시작할 때 클라이언트 앱 인스턴스의 등록 토큰을 생성합니다.
func application(_ application: UIApplication, didFinishLaunchingWithOptions launchOptions: [UIApplication.LaunchOptionsKey: Any]?) -> Bool {
    ...

    //메세지 대리자 설정
    Messaging.messaging().delegate = self

    //현재 등록된 토큰 가져오기
    Messaging.messaging().token { token, error in
      if let error = error {
        print("Error fetching FCM registration token: \(error)")
      } else if let token = token {
        print("FCM registration token: \(token)")  // 토큰을 출력합니다
      }
    }
    return true
}
앱을 실행하여 디버그 화면에 FCM을 검색 해보면 토큰 정보를 확인 해볼수 있습니다.

이제 받아온 토큰 정보를 활용하여 푸시 알림을 전송 해봅시다.
푸시 알림 전송
Firebase 콘솔 화면에서 Cloud Messaging 클릭

첫 번째 캠페인 만들기
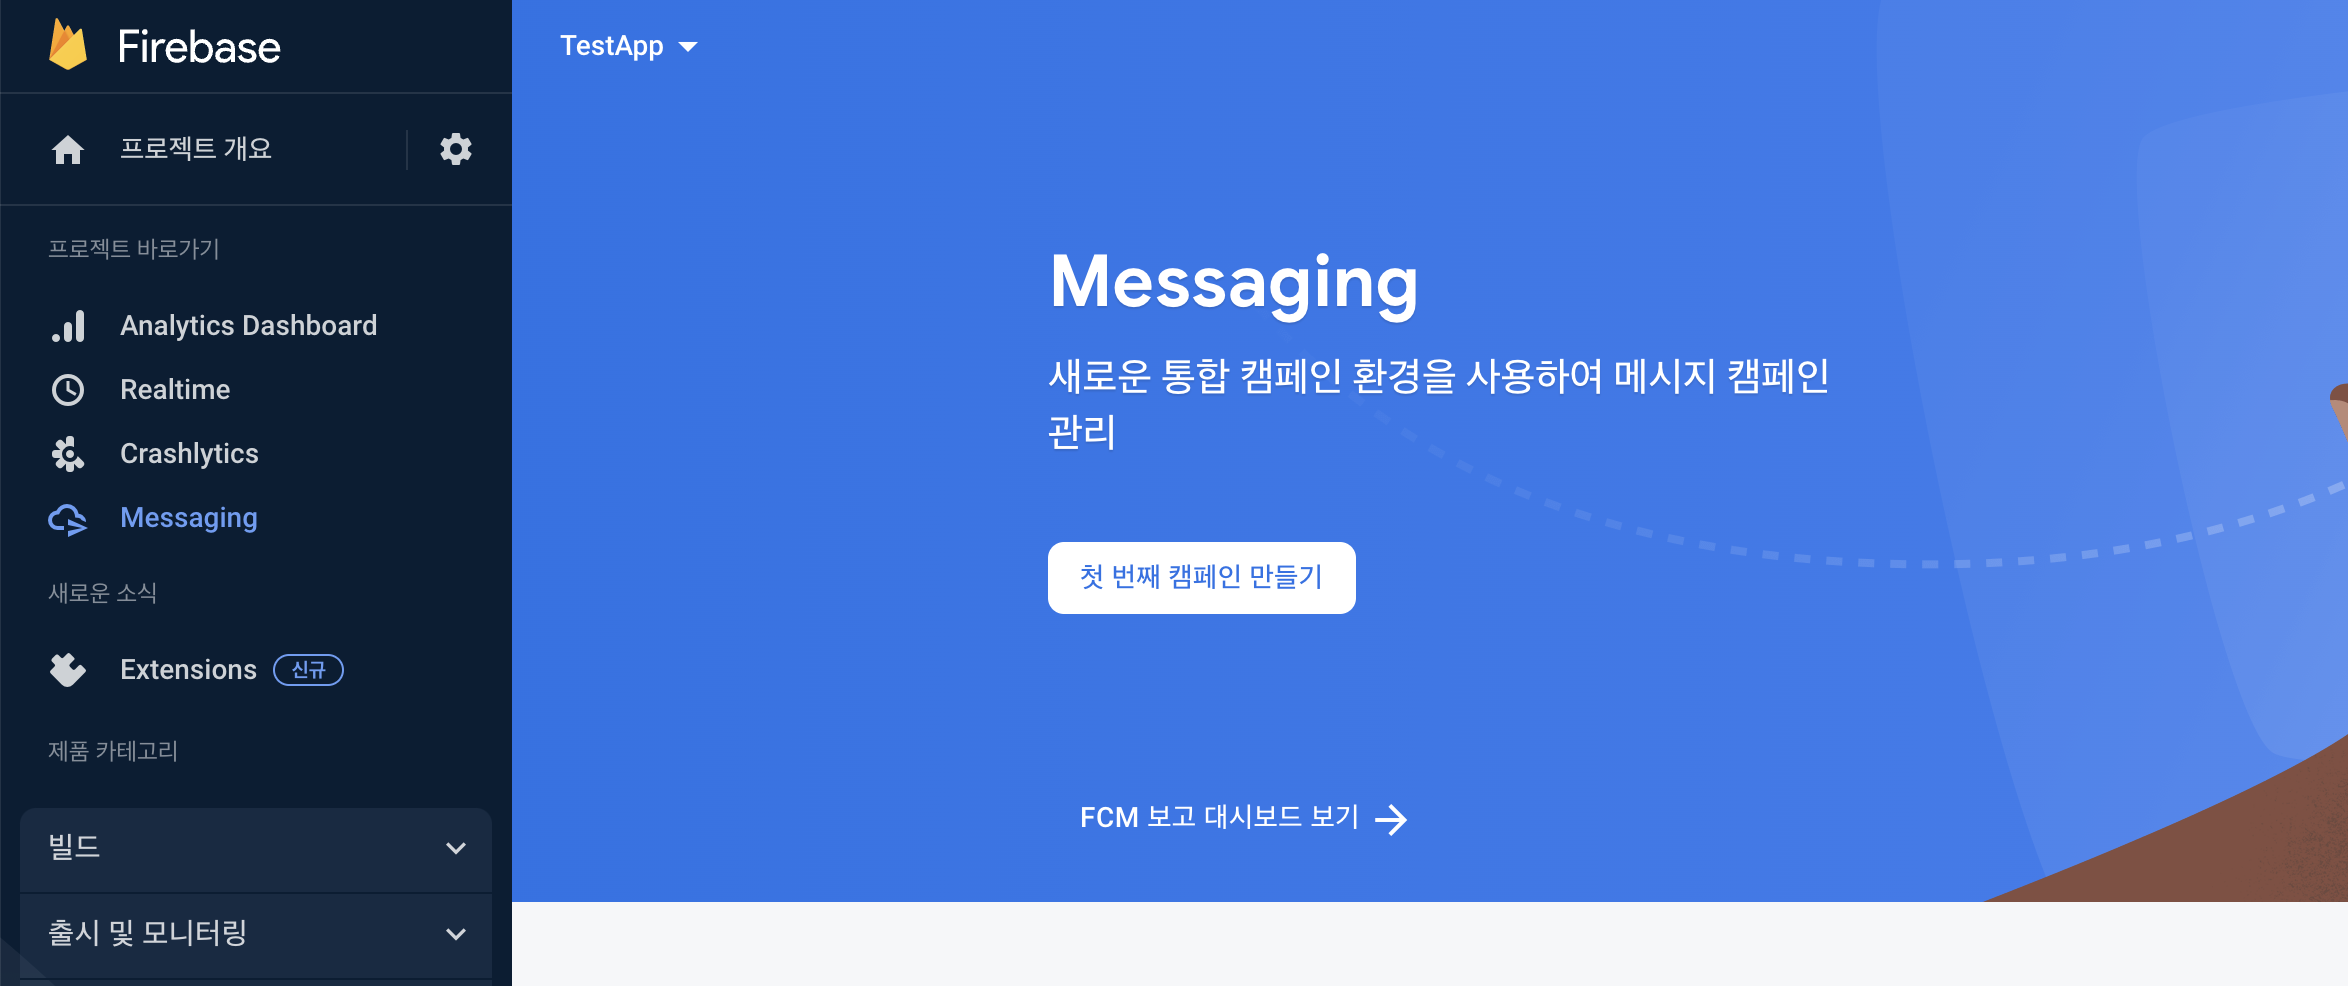
Firebase 알림 메세지 선택
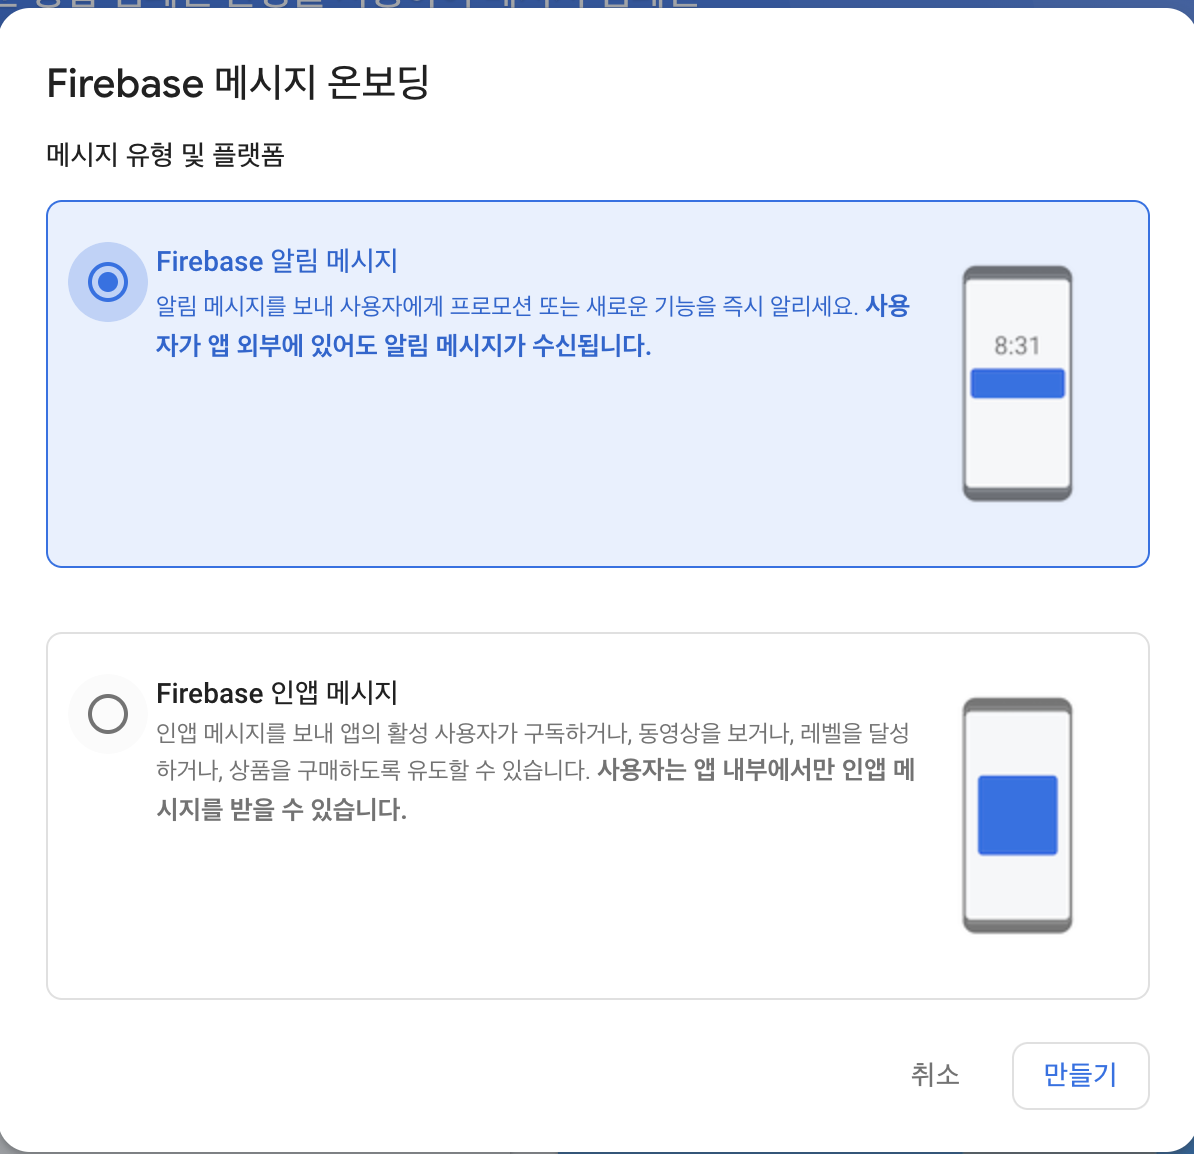
제목, 텍스트를 입력 후 테스트 메시지 전송을 눌러줍니다.

위에서 확인한 FCM 토큰을 추가 해주고 테스트 버튼을 눌러 줍니다.
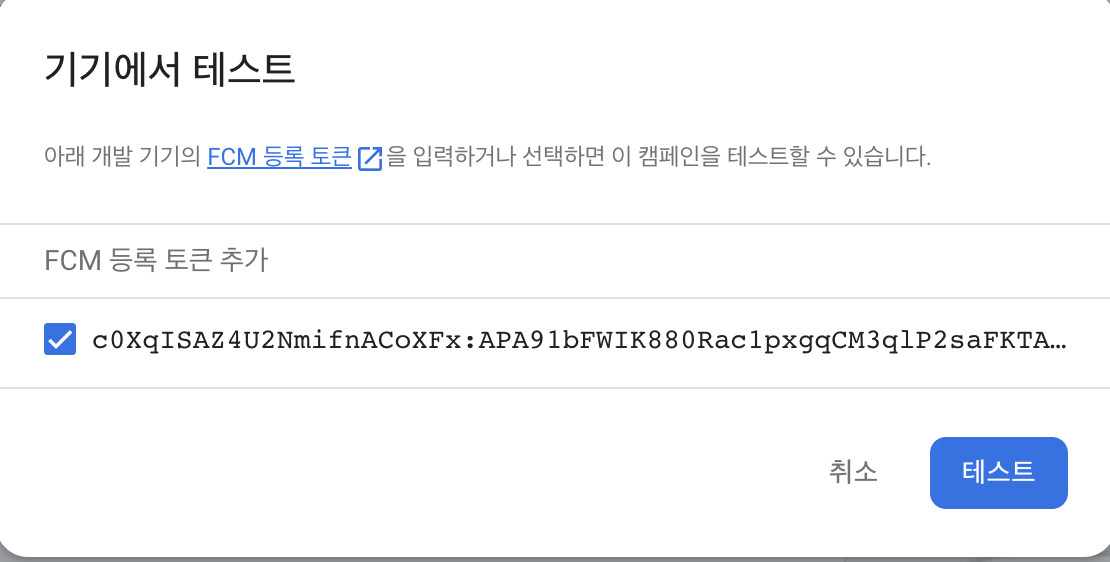
디바이스에서 테스트 결과 잘 도착했습니다.

알림 작성 화면에서 타겟, 예약, 추가 옵션 등을 선택 할 수 있습니다.
전체 사용자에게 전송

추가 옵션의 맞춤 데이터를 활용하여 커스텀 할 수 있습니다.

여기까지 Firebase Cloud Messaging Service 정리였습니다.
'iOS&Swift🍎 > iOS' 카테고리의 다른 글
| iOS Realm Migration(마이그레이션) 하는 법 (0) | 2022.10.13 |
|---|---|
| iOS Codable 사용법 (0) | 2022.10.13 |
| iOS Firebase Crashlytics 사용법 (0) | 2022.10.11 |
| iOS Firebase Analytics 사용법 (0) | 2022.10.11 |
| iOS 다국어 지원 (0) | 2022.10.06 |


